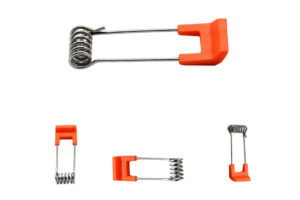
Ecessed Lighting Torsion Spring
 Are you tired of struggling with misaligned ecessed lighting torsion spring during installation? If so, fear not, because the solution lies in understanding the mechanics and possessing the correct tools. As a professional CNC springs maker, we will explore the details of ecessed lighting springs, how they function, and most importantly, how to install them flawlessly.
What are Ecessed Lighting Torsion Springs?
They are small metal coils that secure recessed lighting fixtures in the ceiling. They apply a constant force that holds the fixture in place by attaching the spring to the fixture housing and inserting it into a slot in the ceiling. The tension of the spring holds the fixture firmly against the ceiling, preventing it from moving or falling out of place.
How do Ecessed Lighting Torsion Springs Work?
They work on the principle of torsion, which is the twisting of an object due to torque. In the case of ecessed lighting torsion springs, the spring is twisted when it is inserted into the slot in the ceiling. The tension created by the twisting of the spring holds the fixture in place.
The key to a properly installed ecessed lighting spring is to ensure that the spring is inserted into the slot at the correct angle. If the spring is not inserted correctly, the tension will be uneven, and the fixture will not be held securely in place.
How to Install Ecessed Lighting Torsion Springs
Installing such springs may seem daunting, but with the appropriate tools and a little practice, it can be done easily and quickly. Here are the steps to follow:
Step 1: Turn off the Power
Before installing the ecessed lighting torsion springs, turn off the power to the fixture. This is essential for safety and to prevent damage to the fixture.
Step 2: Insert the Springs
Insert the springs into the slots on the fixture housing, ensuring that they are inserted at the correct angle. If the springs are not inserted correctly, the tension will be uneven, and the fixture will not be held securely in place.
Step 3: Test the Tension
After inserting the springs, test the tension by gently pushing up on the fixture. The fixture should be held securely in place, with no movement or wobbling.
Step 4: Adjust the Springs
If the tension is not even, adjust the springs by twisting them slightly. This will increase or decrease the tension, allowing you to achieve a secure fit.
Step 5: Turn on the Power
Once the ecessed lighting torsion springs are installed and the tension is tested, turn on the power to the fixture.
Torsion Spring Manufacturer
|
Material
|
Carbon steel(SWC), Alloy steel, SEA9260/ 9254/ 6150/ SUP9/ SUP10/ SUP12 /, 51CrV4, stainless steel, music wire/piano wire(SWP);beryllium copper etc.
|
|
Wire diameter or thickness
|
0.2~85mm
|
|
Finish
|
Zinc, Chorme, Nickel, Silver, Gold, Tin, Powder coating, Oxide black or customized
|
|
Ecessed Lighting Torsion Spring Processing Craft
|
|
|
Application
|
Industrial/ auto/ Motorcycle/ electronics/ electric power/ Toys/ Sports/ Machinery equipment etc.
|
|
Springs
|
|
|
Quality certification
|
IATF 16949:2016, ISO 14001:2015, ISO9001:2015, OHSAS 18001:2007
|


